If you’re like many other Mac users, you may occasionally become frustrated with Apple’s Photos app on your Mac. Researchers, for instance, often have large quantities of photos that need to be organized and stored systematically in a folder tree structure for easy access or analysis. The Photos app does not allow you to do this, but all hope is not lost! There is a little-known secret that will allow you to bypass the Photos app and organize your pictures in folders as you wish.
First, create a folder on your Desktop or Documents where you want to save your pictures.
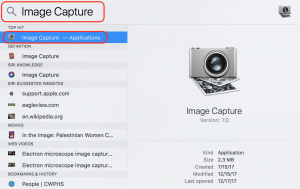
With your device (iPhone, iPad) powered on and tethered to your laptop, and using the Mac Spotlight Search feature (upper right corner of the laptop screen), type in Image Capture, and double-click on Image Capture – Applications in the results window.
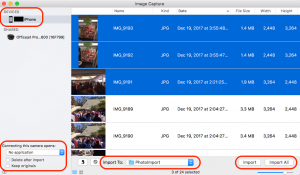
In the application window, click on your device to select it. Images on that device will populate the right-hand pane.
- Select the photos you wish to import (hold down the Command key if you are only choosing a few) or use the Import All button.
- If you wish to delete all content from your device after importing, mark the box Delete after import. Alternately, to keep the originals on your device, mark the Keep originals box.
- Choose the folder where you want the photos to be saved.
- Click on Import to begin the data transfer.
Using the Finder, navigate to the folder you specified and verify that the pictures have been saved to the proper location. You may wish to explore some of the other features in this window to fine tune your workflow!