How to Post Your Oral Histories on the Website
- Navigate to the website here: https://knit.ucsd.edu/rohp/. Make sure you are logged in with your UCSD account. Refer to the post titled, “Instructions to Get Yourself Oriented to the Site” for more information.
- On the homepage of the UCSD Race and Oral History project website, click on the top left button titled “Race and Oral History Project”.

- Click on “Race and Oral History Project” on the top of the page. On the dropdown menu, click on “Dashboard” to take you to a separate page.

- When you are taken to the Dashboard page, hover your cursor over “Posts” on the lefthand menu. Note there is a thumbtack icon next to the “Posts”. On the dropdown menu, click on “Add New Post” to get started on your oral history post.

- You should now be directed to the text editor. Fill out the editor with a title and the text of your post. For Oral History, your title should be: “[first name of interviewee] [last name of interviewee] Oral History.”
- Click “+” button in blue to add a block below the title, then click on the “Paragraph” option. This new block will be where you type your interview synopsis.

When you are finished typing the title and interview synopsis, your oral history post should look like this:

- To attach your audio file into the post, click on the “+” button again and this time, click on “Audio” below the “Media” section.

Select “Upload” and click on the audio file of your oral history interview. The interview should be titled “[first name of interviewee] [last name of interviewee] Oral History Interview.”You should now be able to see another block with the “Play” button on the left and a speaker symbol on the right. Refer to the example below:

- You will then attach an image of the interviewee below the title. Shift your interview synopsis section down by pressing the “Enter” key after clicking your description. This will then reveal a section that says, “Start writing or type/to choose a block” in light grey text.

- After clicking on the space in light grey text, you will see a “+” block that gives a dropdown menu of what you want to place in the free block.

- Select “Image” to upload the photo of your interviewee. Make any adjustments necessary by using the Crop tool or the sidebars on the image to change the size of your interviewee’s photo.
8. After you have successfully uploaded your image, your post should look like this:

9. On the top right corner, click on the gear icon to access the Settings menu.

- Make sure the author name is your name (first name and last name). Scroll down to Categories to see a list of checkboxes.
***PLEASE NOTE: ONLY CHECK ONE BOX FOR EACH CATEGORY. Make sure you have checked the academic term, organization name, course assignment name, and the themes of your oral history assignment.***
- For Academic Year, check the box that corresponds to your current academic term.
- For Community Partners, check the box that corresponds to your organization name.
- For Course Assignments, check the “Oral Histories” box ONLY.
- Lastly, for Themes, check the corresponding themes that align with your oral history interview topics.
10. After you are finished checking the Categories for your post, make sure you look over and review your post again before clicking on the “Update” button on the top right corner. Note that you can make further changes even after publishing your oral history post.
11. To locate your oral history post after publishing, go back to the homepage of the ROHP site. On the top menu, click on the organization name of your interviewee.

- After you are taken to the organization page, you should see the title of your oral history post on the lefthand most side of the directory along with the date your post was published.

- Click on the title link of your oral history post to verify that your post was successfully published on the site. You should see something similar to the example given below:

- Scroll down to the bottom of the audio file to see the Author Info and the Post Info at the bottom.
- The Post Info has the list of categories that you selected in the bottom, and your full name at the top.

- You can also click on the Author Info tab to see your information.

An Alternative Way to Verify and Locate Your Post
1. Hover your cursor over “Race and Oral History Project” on the top of the page. Select “Dashboard” in the options.
2. Hover your cursor over to the same thumbtack icon next to the title “Posts.” Click on “All Posts”. Find your post, hover your cursor over it, and click “Quick Edit.”
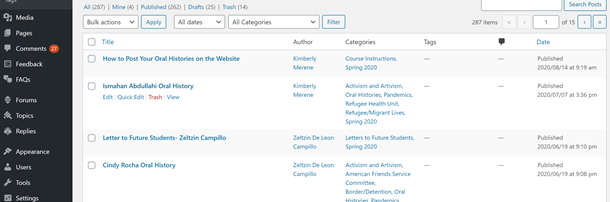
3. You should be able to see your name and title of your oral history post. In the “Categories” section, check to verify the correct categories checkboxes were marked.
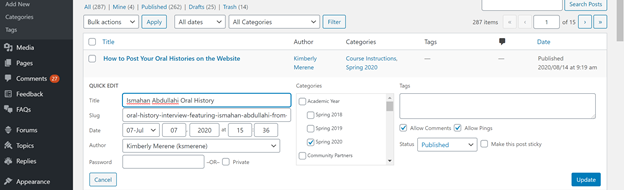
4. Click the blue “Update” button in the bottom right.
5. Click the “View” option under the title of your post to navigate to your post on the website.